
10 Genius Red Lobster Mix Recipes (Beyond Biscuits!)

That iconic red box of Red Lobster Cheddar Bay Biscuit Mix sitting in your pantry holds a universe of culinary potential. We all adore those warm, cheesy, garlicky clouds of goodness that arrive at the table, steaming and irresistible. But to think of them only as a side dish is to miss out on the true magic. That simple mix is your secret weapon, a shortcut to unlocking a world of ridiculously easy and incredibly delicious meals.
This isn’t just about making biscuits. It’s about reimagining what a pantry staple can do. It’s about transforming a familiar comfort into the foundation for creativity. Get ready to turn this beloved mix from a supporting actor into the star of your breakfast, lunch, and dinner table (and even dessert!) with these ten genius Red Lobster Mix recipes that go way, way beyond the biscuit basket.
“Cooking is at once child’s play and adult joy. And cooking done with care is an act of love.” — Craig Claiborne
Before we dive in, let’s understand why this mix is so versatile. It’s a perfectly balanced combination of flour, leavening agents (like baking powder), fat (in powdered form), and seasonings. This means the basic structure for creating tender, flaky baked goods is already done for you. All you have to do is guide it in a new direction.
Recipe Overview
| Recipe Name | Primary Flavor | Estimated Difficulty |
|---|---|---|
| Cheesy Garlic Pizza Crust | Savory | Easy |
| Chicken & Biscuit Dumplings | Savory | Easy |
| Chicken & Veggie Cobbler | Savory | Easy |
| Crispy Oven-Baked Chicken | Savory | Easy |
| Cheesy Taco Pie Topping | Savory | Easy |
| Savory Cheddar Waffles | Savory | Easy |
| Cheddar Bay Calzones | Savory | Moderate |
| Easy Quiche Topping | Savory | Easy |
| Cinnamon-Sugar Drop Donuts | Sweet | Easy |
| Chocolate Chip Cookies | Sweet & Savory | Easy |
1. Cheesy Garlic Pizza Crust

Imagine it’s Friday night. The craving for pizza hits hard, but the thought of waiting for delivery is a drag. What if you could whip up a crust that’s not just a base, but a star in its own right? Forget delivery! This recipe creates a flavorful, cheesy, and satisfyingly chewy pizza crust that will make your homemade pizza night legendary. The garlic and herb flavors are baked right in, creating a perfect foundation for all your favorite toppings.
Ingredients
- 1 box Red Lobster Cheddar Bay Biscuit Mix
- ½ cup shredded sharp cheddar cheese
- ¾ cup cold water
- 2 tablespoons all-purpose flour, for dusting
- 1 pouch garlic & herb seasoning (from the mix)
- 2 tablespoons unsalted butter, melted
- Your favorite pizza sauce, cheese, and toppings (like pepperoni, mushrooms, olives, and bell peppers)
Instructions
- Prep Your Oven and Pan: Preheat your oven to 425°F (218°C). A hot oven is key for a crispy crust. Lightly grease a 12-inch pizza pan or a large baking sheet.
- Combine the Dry Ingredients: In a medium bowl, whisk together the biscuit mix, shredded cheddar cheese, and half of the garlic & herb seasoning packet. We’re saving the other half for a flavor-packed finish later.
- Form the Dough: Pour in the cold water. Why cold? It helps keep the little bits of fat in the mix solid, which creates steam in the hot oven, resulting in a more tender, flaky texture. Stir with a fork or spatula until a soft, sticky dough forms. Be careful not to overmix! A lumpy, slightly shaggy dough is exactly what you want.
- Knead Gently: Turn the dough out onto a surface lightly dusted with flour. Sprinkle a little more flour on top of the dough. Gently knead it just 5-6 times—seriously, that’s it! You’re just trying to bring it together into a smooth ball, not develop gluten like you would for bread.Pro-Tip: If your dough feels extra sticky, don’t panic. Just work in a tiny bit more flour, a teaspoon at a time, until it becomes manageable and easy to press out.
- Shape the Crust: Press the dough into your prepared pizza pan. Work from the center outwards, forming an even layer. Use your fingertips to build up a slightly thicker edge to hold in all your toppings.
- Par-Bake the Crust: This is a crucial step to avoid a soggy bottom! Bake the plain crust for 6-8 minutes, just until it’s set and looks lightly golden. This gives it a head start before you load it up with sauce.
- Create the Garlic Butter: While the crust is baking, melt the butter in a small bowl and stir in the remaining half of the garlic & herb seasoning packet. The smell alone is worth it!
- Brush and Top: Remove the par-baked crust from the oven. Brush the seasoned butter generously over the entire surface, paying special attention to the edges. This is where the magic happens. Now, spread on your pizza sauce, sprinkle with mozzarella, and pile on your favorite toppings.
- Final Bake: Return the pizza to the oven and bake for another 10-12 minutes, or until the cheese is gloriously bubbly and the crust is a deep golden brown. Let it rest for a minute before slicing.
2. Chicken & Biscuit Dumplings
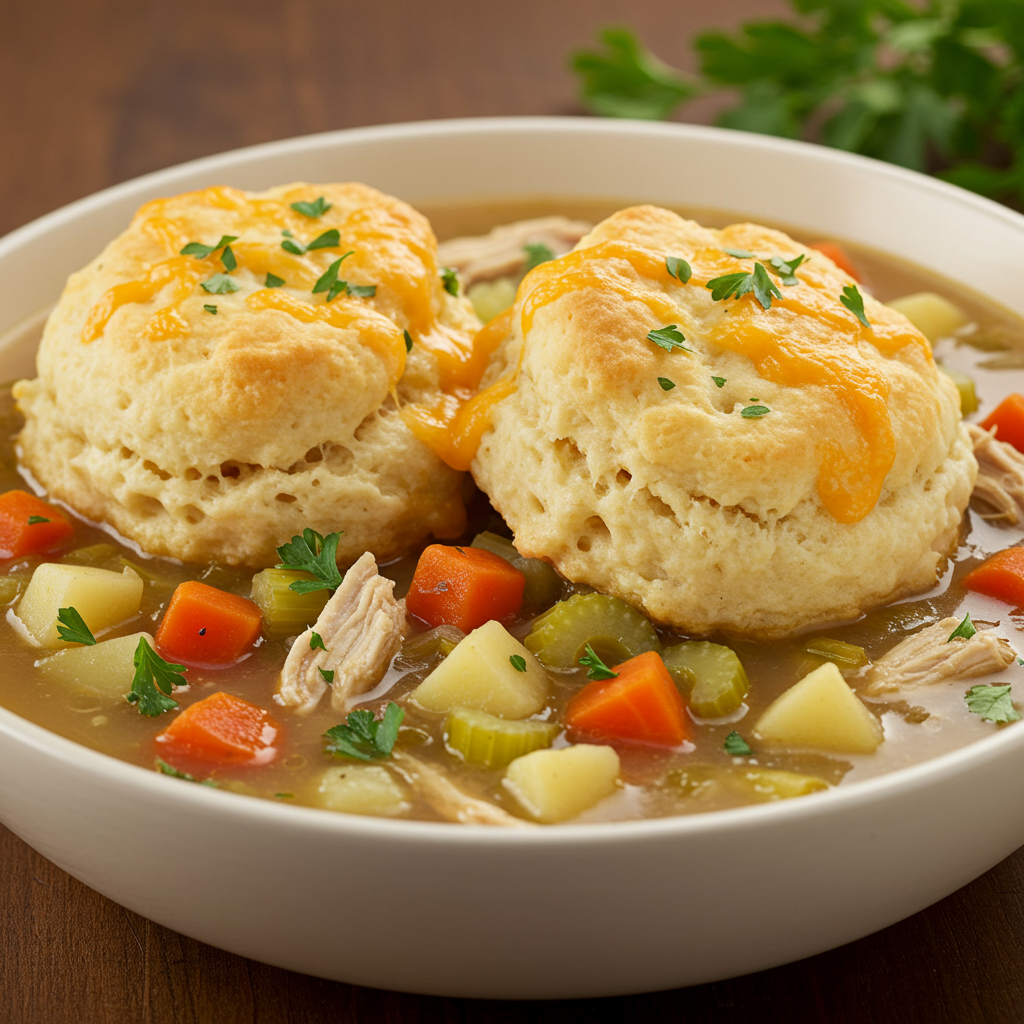
This is the culinary equivalent of a warm hug. It’s comfort food at its absolute easiest, transforming your favorite chicken soup into a hearty, satisfying, one-pot meal. The dumplings are the real heroes—fluffy, savory, and unbelievably tender, they soak up the delicious broth and are packed with that signature cheesy, garlicky flavor.
Ingredients
- 1 box Red Lobster Cheddar Bay Biscuit Mix
- ½ cup shredded sharp cheddar cheese
- ¾ cup cold water or milk (milk makes for a richer dumpling)
- 8 cups chicken broth
- 4 cups cooked, shredded chicken (a rotisserie chicken is a great shortcut!)
- 2 cups mixed vegetables (a frozen blend of carrots, celery, peas, and corn is perfect)
- 1 pouch garlic & herb seasoning (from the mix)
- 2 tablespoons unsalted butter, melted
Instructions
- Start the Soup Base: In a large, heavy-bottomed pot or Dutch oven, combine the chicken broth, shredded chicken, and mixed vegetables. Bring everything to a gentle simmer over medium heat. You want it happily bubbling, not furiously boiling.
- Mix the Dumpling Dough: While the soup heats up, prepare the dumpling dough. In a medium bowl, combine the biscuit mix and cheddar cheese. Pour in the cold water or milk and stir with a fork until just combined. Again, the golden rule is do not overmix! A few lumps are your friends; they promise a light, airy dumpling, not a dense, chewy one.Pro-Tip: Use a small cookie or ice cream scoop to portion the dough. This creates uniformly sized dumplings that will cook evenly and look beautiful floating in the pot. It’s also much less messy!
- Drop the Dumplings: Once the soup is simmering, it’s time for the dumplings to take the plunge. Drop rounded tablespoonfuls of the biscuit dough directly into the simmering broth. Try to space them out, as they will puff up and expand significantly as they cook.
- Steam to Perfection: Cover the pot with a tight-fitting lid, reduce the heat to low, and let the dumplings steam for 10-12 minutes. The most important part of this step is to resist the urge to lift the lid! Peeking releases the steam needed to cook the dumplings through, which can make them heavy.
- The Big Reveal: After 10-12 minutes, uncover the pot. The dumplings should be beautifully puffed up and cooked through. To be sure, you can test one by inserting a toothpick into its center; it should come out clean.
- The Final Flourish: Melt the butter and mix it with the entire garlic & herb seasoning packet. Gently brush or drizzle this glorious butter over the tops of the cooked dumplings right in the pot. Serve hot and watch everyone swoon.
3. Savory Chicken & Veggie Cobbler
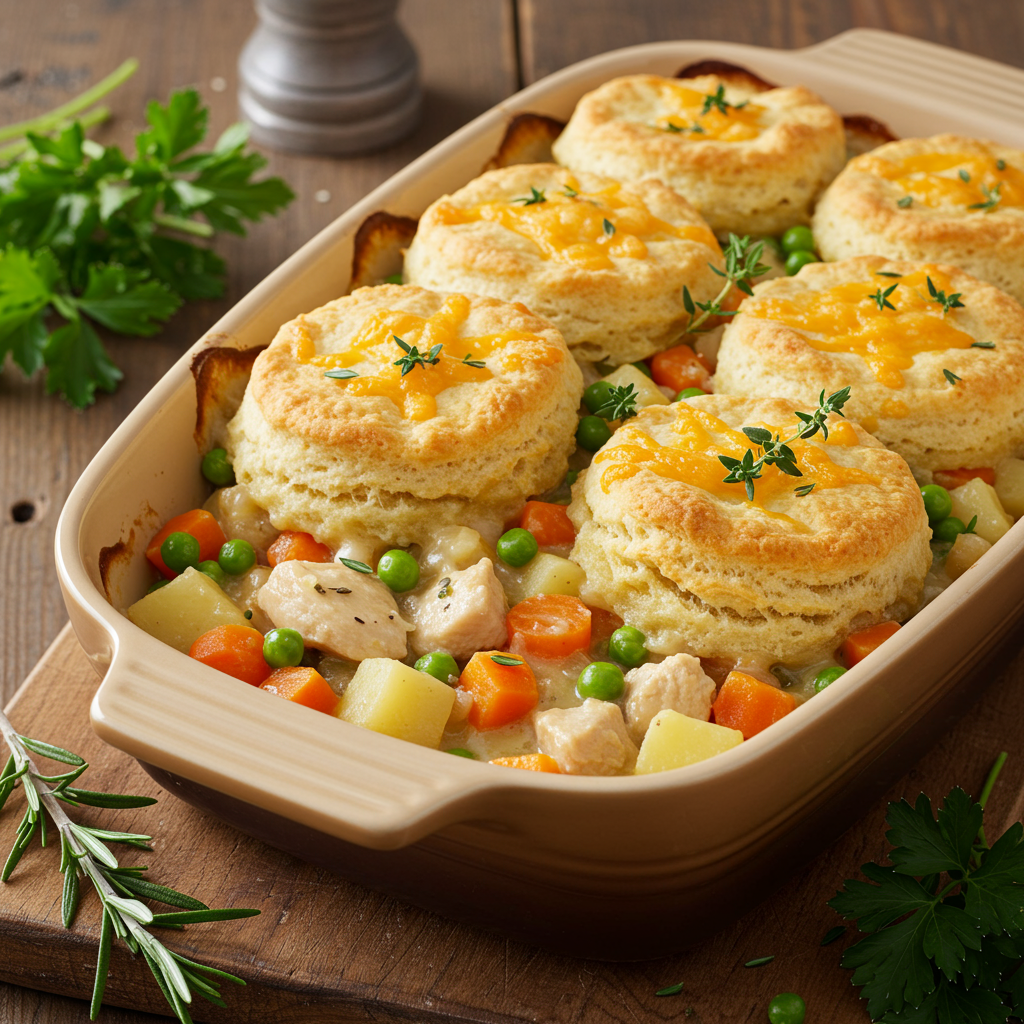
Imagine a creamy, dreamy chicken pot pie, but with a topping so good it completely steals the show. This savory cobbler is the ultimate weeknight winner. It features a rich, bubbly chicken and vegetable filling crowned with soft, golden-brown Cheddar Bay biscuits that bake right on top. It’s a complete, comforting meal that looks impressive but comes together with minimal effort.
Ingredients
- 1 box Red Lobster Cheddar Bay Biscuit Mix
- 1 lb boneless, skinless chicken breast, cut into 1-inch cubes
- 1 tablespoon olive oil
- 1 cup chopped yellow onion
- 2 cups mixed vegetables, frozen or fresh (carrots, peas, and green beans work wonderfully)
- 1 can (10.5 oz) cream of chicken soup
- ½ cup milk
- ½ cup shredded sharp cheddar cheese
- ¾ cup cold water
- 1 pouch garlic & herb seasoning (from the mix)
- 2 tablespoons unsalted butter, melted
Instructions
- Preheat and Prep: Preheat your oven to 400°F (200°C).
- Sauté the Chicken and Onion: In a large oven-safe skillet, heat the olive oil over medium-high heat. Add the chicken cubes and cook until they are lightly browned on all sides. This step sears the chicken, locking in its juices. Add the chopped onion and cook for another 2-3 minutes until it softens and becomes fragrant.
- Build the Filling: Stir in the mixed vegetables, the can of cream of chicken soup, and the milk. Bring the mixture to a simmer and let it bubble gently for 5 minutes, stirring occasionally. This allows the flavors to meld and the sauce to thicken into a delicious, creamy base.
- Prepare the Biscuit Topping: While the filling simmers, get your topping ready. In a separate bowl, combine the biscuit mix and the shredded cheddar cheese. Stir in the cold water until a soft, shaggy dough forms.Pro-Tip: If you don’t have an oven-safe skillet, simply pour the cooked filling into an 8×8 inch or similar-sized baking dish before adding the topping.
- Assemble the Cobbler: Drop large spoonfuls of the biscuit dough evenly over the hot filling in the skillet or baking dish. Don’t worry about creating a perfect, sealed layer. The rustic, “cobbled” look is part of its charm!
- Bake to Golden Perfection: Place the dish in the preheated oven and bake for 20-25 minutes. You’ll know it’s ready when the filling is hot and bubbly around the edges and the biscuit topping is a beautiful golden brown and cooked through.
- The Garlic Butter Finish: As soon as the cobbler comes out of the oven, melt the butter and stir in the garlic & herb seasoning packet. Brush this fragrant butter mixture all over the hot biscuit topping. Let it rest for a few minutes to set, then serve warm.
4. Crispy Oven-Baked Chicken
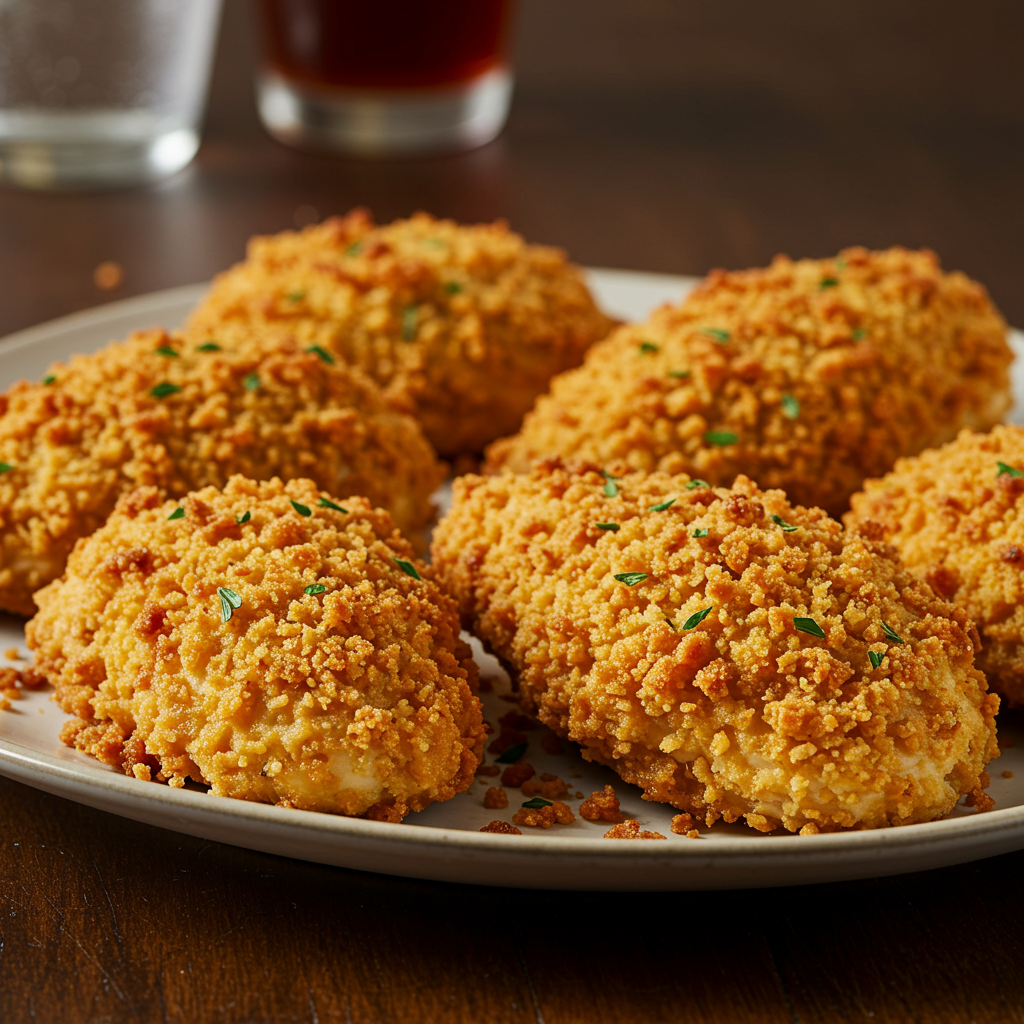
Move over, messy fried chicken! This genius hack uses the dry biscuit mix as a phenomenal savory, crunchy coating for chicken that bakes to crispy perfection right in the oven. You get all the flavor and crunch of fried chicken with way less mess and fuss. It’s a weeknight dinner revolution that delivers an incredible Cheddar Bay flavor in every single bite.
Ingredients
- 1 box Red Lobster Cheddar Bay Biscuit Mix
- 1 pouch garlic & herb seasoning (from the mix)
- 2 lbs chicken pieces (drumsticks, thighs, or breasts all work well)
- 2 large eggs
- 1 tablespoon water
- Cooking spray
Instructions
- Set Up Your Station: Preheat your oven to 400°F (200°C). The secret to all-over crispiness is a wire rack. Place a wire rack on top of a baking sheet and lightly spray the rack with cooking spray to prevent sticking.
- Create the Breading: This is the key step. Pour the entire dry biscuit mix into a shallow dish or pie plate. Add the entire garlic & herb seasoning packet and whisk with a fork until everything is thoroughly combined. You are using the mix itself as the breading—do not add any liquid!
- Prepare the Egg Wash: In a separate shallow dish, crack the two eggs and add a tablespoon of water. Beat with a fork until smooth and uniform. The water thins the egg slightly, helping it coat the chicken more evenly.
- Dry the Chicken: Pat your chicken pieces completely dry with a paper towel. This is a non-negotiable step for a super crispy coating. A dry surface helps the egg wash and breading adhere perfectly.
-
Coat the Chicken (Dip, Dredge, Place):
- Dip: Working one piece at a time, dip the chicken into the egg wash, turning to coat it completely. Let any excess egg drip back into the dish.
- Dredge: Immediately transfer the egg-coated chicken to the dry biscuit mix. Press gently on all sides, ensuring the entire surface is covered in a thick, even layer of the savory coating.
- Place: Carefully place the coated chicken piece on the prepared wire rack. Leave a little space between each piece.Pro-Tip: Using a wire rack is crucial. It elevates the chicken, allowing hot air to circulate underneath. This cooks the bottom of the chicken to crispy perfection instead of letting it steam and get soggy on the baking sheet.
- Bake Until Crispy: Lightly spray the tops of the chicken with cooking spray, which helps the coating brown and crisp up beautifully. Bake for 35-45 minutes (depending on the size and cut of your chicken pieces). The chicken is done when it’s deep golden brown, crispy, and cooked through to an internal temperature of 165°F (74°C). There’s no need to brush with butter—all that incredible flavor is already locked into the crust!
5. Cheesy Taco Pie Topping
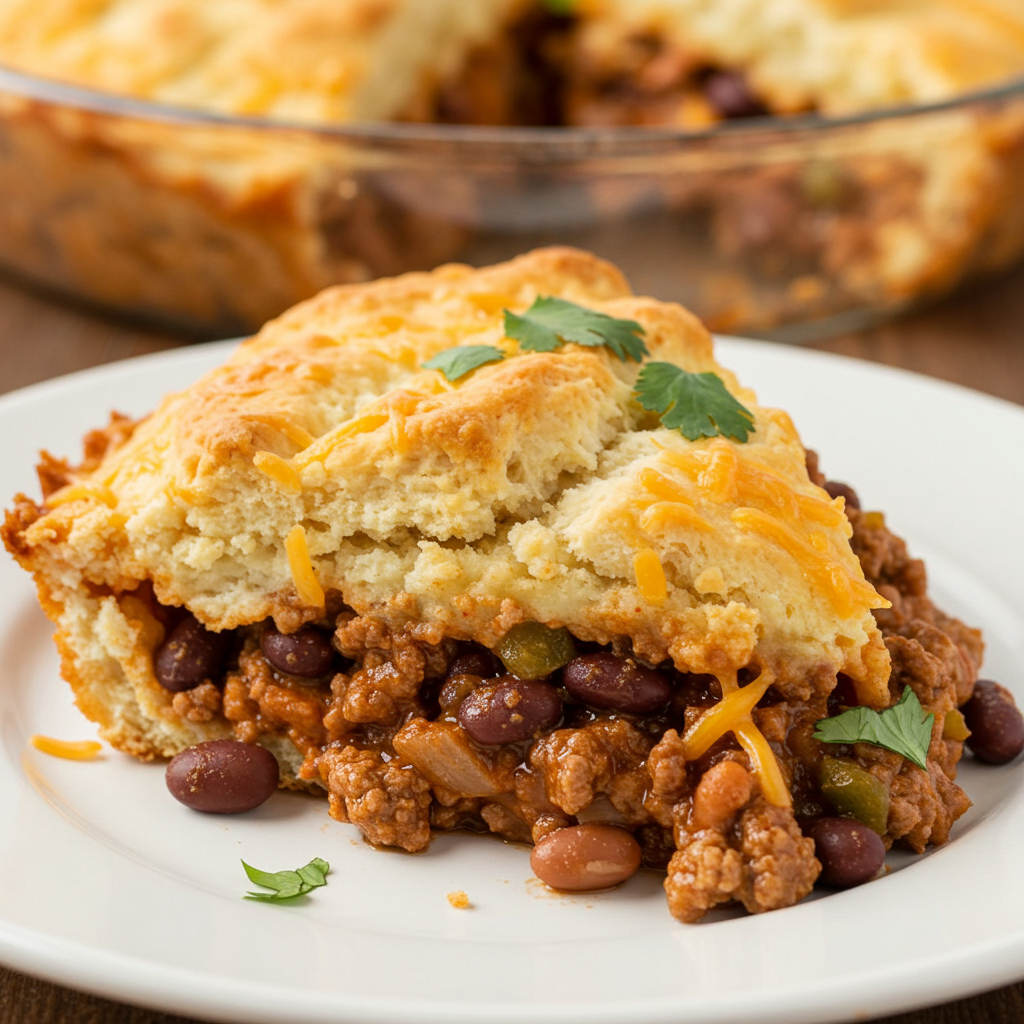
Give your beloved taco night a fun, hearty, and comforting twist. This recipe marries a savory, flavorful ground beef filling with a fluffy, cheesy, biscuit-style topping. It’s like a taco and a pot pie had a delicious baby, and it’s a guaranteed hit with the whole family. Plus, it’s a fantastic way to serve tacos without all the mess of crumbling shells.
Ingredients
- 1 lb ground beef or turkey
- 1 packet taco seasoning
- ⅔ cup water
- 1 can (15 oz) black beans, rinsed and drained
- 1 cup corn kernels (frozen, fresh, or canned)
- 1 box Red Lobster Cheddar Bay Biscuit Mix
- ½ cup shredded cheddar or Monterey Jack cheese
- ¾ cup cold water
- Optional toppings: shredded lettuce, diced tomatoes, sour cream, salsa, sliced avocado
Instructions
- Preheat and Prep the Filling: Preheat your oven to 375°F (190°C). In a large skillet, cook the ground meat over medium-high heat, breaking it apart with a spoon, until it’s no longer pink. Drain off any excess fat.
- Season the Filling: Stir the taco seasoning packet and ⅔ cup of water into the cooked meat. Bring the mixture to a simmer and cook for 3-4 minutes, allowing the sauce to thicken and coat the meat beautifully.
- Add Beans and Corn: Remove the skillet from the heat and stir in the rinsed black beans and corn. This adds great texture, flavor, and nutrition to the filling.
- Assemble the Pie: Spread the meat mixture evenly into a 9-inch pie plate or a similar-sized casserole dish.
- Mix the Biscuit Topping: In a bowl, prepare the topping by mixing the biscuit mix, shredded cheese, and ¾ cup of cold water. Stir with a spatula only until a soft, slightly sticky dough forms. Remember the golden rule: don’t overmix!Pro-Tip: Grate your own cheddar cheese from a block. Pre-shredded cheeses are often coated in cellulose or potato starch to prevent clumping, which can give them a slightly powdery texture and prevent them from melting as smoothly.
- Top the Pie: Dollop the biscuit dough over the top of the meat filling. Use the back of a spoon to gently spread it out, covering most of the surface. It’s perfectly fine if some of the filling peeks through the sides—it looks rustic and inviting.
- Bake and Serve: Bake for 20-25 minutes, or until the topping is a lovely golden brown and a toothpick inserted into the biscuit portion comes out clean. Let the taco pie cool for 5-10 minutes before slicing. This helps it set up so you can serve clean wedges. Serve with all your favorite taco toppings on the side. You won’t need the garlic butter packet for this recipe, so you can save it to spread on toast or melt over vegetables another day!
6. Savory Cheddar Waffles
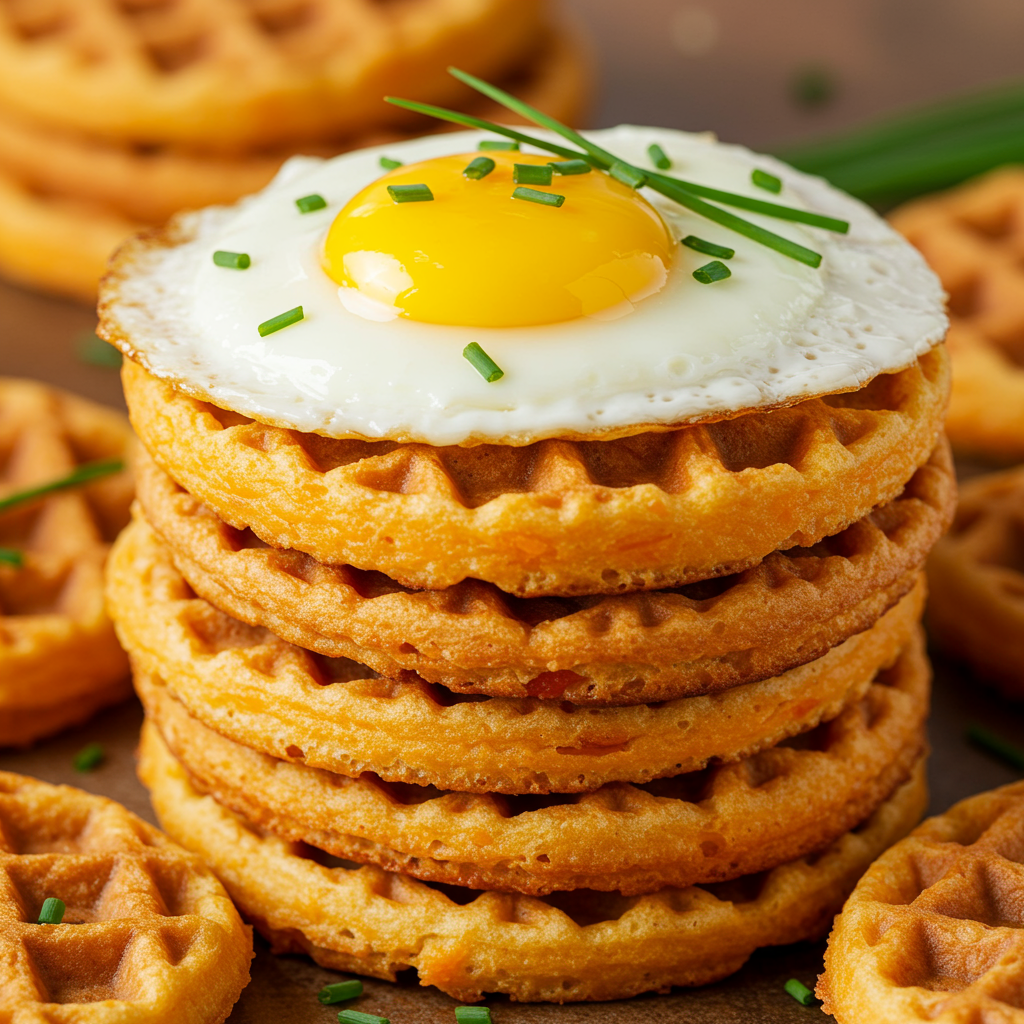
Breakfast for dinner, anyone? Or maybe just an epic weekend brunch? These savory waffles are a complete game-changer. They’re fluffy and tender on the inside, wonderfully crispy on the outside, and absolutely loaded with that irresistible cheddar-garlic flavor we all love. Top them with a fried egg for a runny-yolk sauce, slather them with cream cheese and chives, or use two waffles as the “bread” for a next-level chicken sandwich.
Ingredients
- 1 box Red Lobster Cheddar Bay Biscuit Mix
- 1 pouch garlic & herb seasoning (from the mix)
- 1 cup shredded sharp cheddar cheese
- 1 cup milk or buttermilk (buttermilk adds a delicious tang!)
- 1 large egg
- 2 tablespoons unsalted butter, melted
Instructions
- Preheat Your Waffle Iron: Get your waffle iron hot and ready according to the manufacturer’s instructions. A properly preheated iron is essential for getting that crispy exterior.
- Mix the Dry Ingredients: In a medium bowl, whisk together the dry biscuit mix, the entire garlic & herb seasoning packet, and the shredded cheddar cheese. This ensures the cheese and seasoning are evenly distributed.
- Mix the Wet Ingredients: In a separate small bowl, whisk together the milk (or buttermilk), the egg, and the cooled melted butter until just combined.
- Combine Wet and Dry: Pour the wet ingredients into the bowl with the dry ingredients. Stir with a spatula until just combined. A few lumps in the batter are perfectly fine—in fact, they are desirable! Overmixing will develop gluten and lead to tough, dense waffles.
- Grease the Iron: Lightly grease your preheated waffle iron with cooking spray or a little bit of butter on a pastry brush.
- Cook the Waffles: Pour the batter onto the hot waffle iron (about ½ to ¾ cup per waffle, depending on your iron’s size) and spread it slightly with your spatula. Close the lid.Pro-Tip: For an unbelievable extra cheesy crunch, sprinkle a little extra shredded cheddar directly onto the hot waffle iron right before adding the batter. The cheese will fry into a crispy, lacey “frico” on the outside of your waffle.
- Watch the Steam: Cook for 3-5 minutes. A good indicator of doneness is when the steam coming from the waffle iron slows down or stops. The waffle should be a deep golden brown and crispy.
- Serve Immediately: Carefully remove the waffle and repeat the process with the remaining batter. These are best served immediately while they’re hot and crispy.
7. Cheddar Bay Calzones
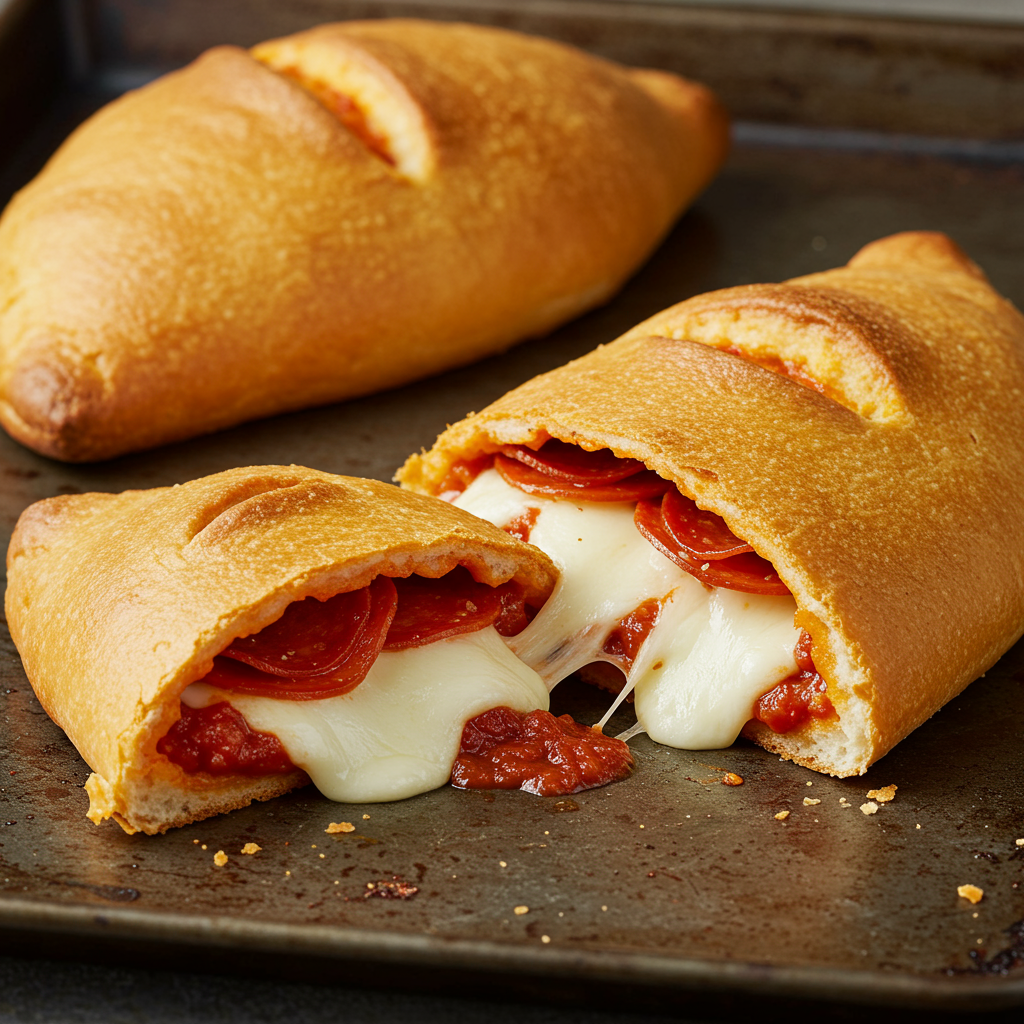
This is where the biscuit mix truly flexes its muscles and shows off its incredible versatility. By treating the biscuit dough like a classic pizza dough, you can create amazing, hand-held calzones stuffed with all your favorite fillings. It’s a fun, deeply satisfying meal that feels special and gourmet but is secretly super simple to make. Perfect for a weeknight dinner or a fun cooking project with kids.
Ingredients
- 1 box Red Lobster Cheddar Bay Biscuit Mix
- ½ cup shredded cheddar cheese
- ¾ cup cold water
- ¼ cup all-purpose flour, for dusting and kneading
- 1 ½ cups of your favorite calzone fillings (e.g., marinara sauce, mozzarella cheese, sautéed mushrooms, bell peppers, onions, cooked ground beef)
- 1 egg, beaten (for a shiny egg wash)
- 1 pouch garlic & herb seasoning (from the mix)
- 2 tablespoons unsalted butter, melted
Instructions
- Prep Oven and Baking Sheet: Preheat your oven to 400°F (200°C). Line a large baking sheet with parchment paper for easy cleanup.
- Make the Dough: In a bowl, combine the biscuit mix and cheddar cheese. Stir in the cold water until a sticky dough comes together.
- Knead the Dough: Turn the sticky dough out onto a well-floured surface. Sprinkle the ¼ cup of flour over and around the dough. This is an important step that transforms the sticky biscuit dough into a workable calzone dough. Gently knead for just 1-2 minutes, incorporating enough of the flour so the dough becomes smooth, pliable, and no longer sticky to the touch.
- Divide and Roll: Divide the dough into 4 equal portions. On your floured surface, use a rolling pin to roll each portion into a rough 6-inch circle, about ¼-inch thick.
- Fill the Calzones: Spoon about ⅓ to ½ cup of your desired fillings onto one half of each dough circle. Be sure to leave a clean ½-inch border around the edge so you can get a good seal.Pro-Tip: Don’t overfill your calzones, as tempting as it is! Too much filling can cause them to burst open while baking. Less is more here.
- Seal and Crimp: Fold the empty half of the dough over the filling to create a classic half-moon shape. Firmly pinch the edges together with your fingers to seal, then go back and crimp the edge with the tines of a fork. This not only looks nice but creates a super-tight seal.
- Final Prep for Baking: Place the calzones on the prepared baking sheet. Brush the tops with the beaten egg—this egg wash will give them a beautiful, shiny, golden-brown finish. Finally, cut a small slit in the top of each calzone to allow steam to escape during baking.
- Bake: Bake for 15-20 minutes, or until the calzones are puffed up and a deep golden brown.
- The Grand Finale: While they bake, melt the butter and stir in the entire garlic & herb seasoning packet. Brush this glorious butter over the hot calzones the moment they come out of the oven. Serve with a side of warm marinara for dipping.
8. Easy Quiche Topping
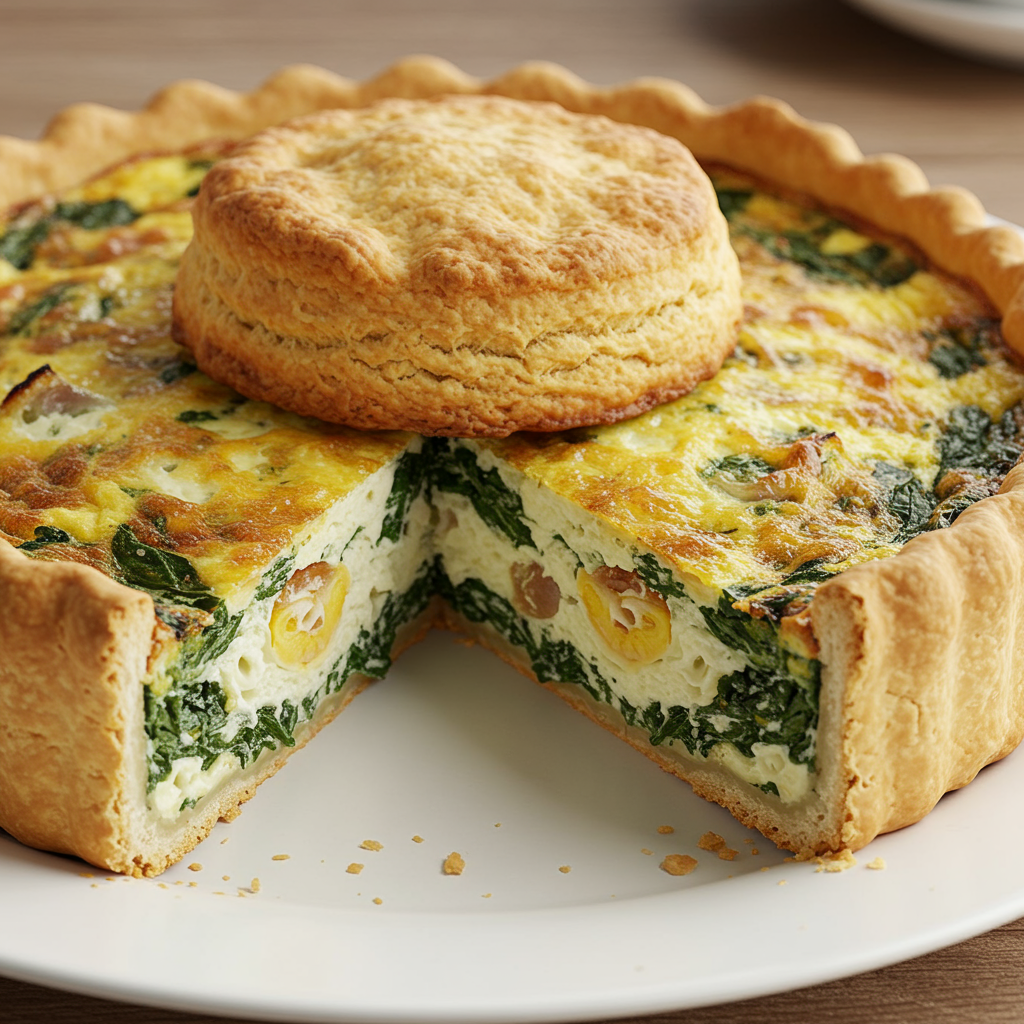
Elevate your brunch game (or create a simple, elegant dinner) with this incredibly clever quiche hack. Instead of fussing with a traditional, time-consuming pastry crust, this recipe uses a fluffy, savory Cheddar Bay biscuit layer right on top. The biscuit topping bakes up golden and light, creating a wonderful textural contrast with the rich, creamy egg filling below. It’s an “impossible pie” of the best kind.
Ingredients
-
For the Quiche Filling:
- 6 large eggs
- 1 cup heavy cream or whole milk
- 1 cup of your favorite fillings (e.g., cooked and drained spinach, sautéed mushrooms, diced onions, broccoli florets, cooked diced ham)
- 1 cup shredded Swiss or Gruyere cheese
- Salt and pepper to taste
-
For the Topping:
- 1 box Red Lobster Cheddar Bay Biscuit Mix
- ½ cup shredded cheddar cheese
- ¾ cup cold water
Instructions
- Prep Oven and Dish: Preheat your oven to 375°F (190°C). Generously grease a 9-inch deep-dish pie plate.
- Layer the Fillings: Spread your prepared fillings (spinach, mushrooms, etc.) and the shredded Swiss or Gruyere cheese evenly across the bottom of the greased pie plate.
- Make the Custard: In a large bowl, whisk together the eggs, heavy cream (or milk), salt, and pepper until everything is smooth and well-combined. Gently pour this egg mixture over the fillings in the pie plate.
- Partial Bake: Bake the quiche for 15 minutes. This initial bake is key; it helps the eggs to set slightly around the edges, creating a stable base for the topping so it doesn’t sink to the bottom.
- Mix the Topping: While the quiche is having its first bake, quickly prepare the biscuit topping. In a bowl, stir together the biscuit mix, cheddar cheese, and cold water until just combined into a soft dough.
- Top the Quiche: Carefully remove the partially baked quiche from the oven. Drop spoonfuls of the biscuit batter evenly over the top of the egg mixture.Pro-Tip: Don’t try to spread the batter or cover the entire surface perfectly. The biscuit dough will spread out as it bakes, creating a beautiful, rustic cobbler-style topping with bits of the egg custard peeking through.
- Final Bake: Return the quiche to the oven and bake for another 25-30 minutes. It’s done when the topping is golden brown and a knife inserted into the center of the eggs comes out clean. Let it rest for 10 minutes before slicing and serving. This allows the custard to fully set. You can save the garlic butter packet for another use!
9. Cinnamon-Sugar Drop Donuts
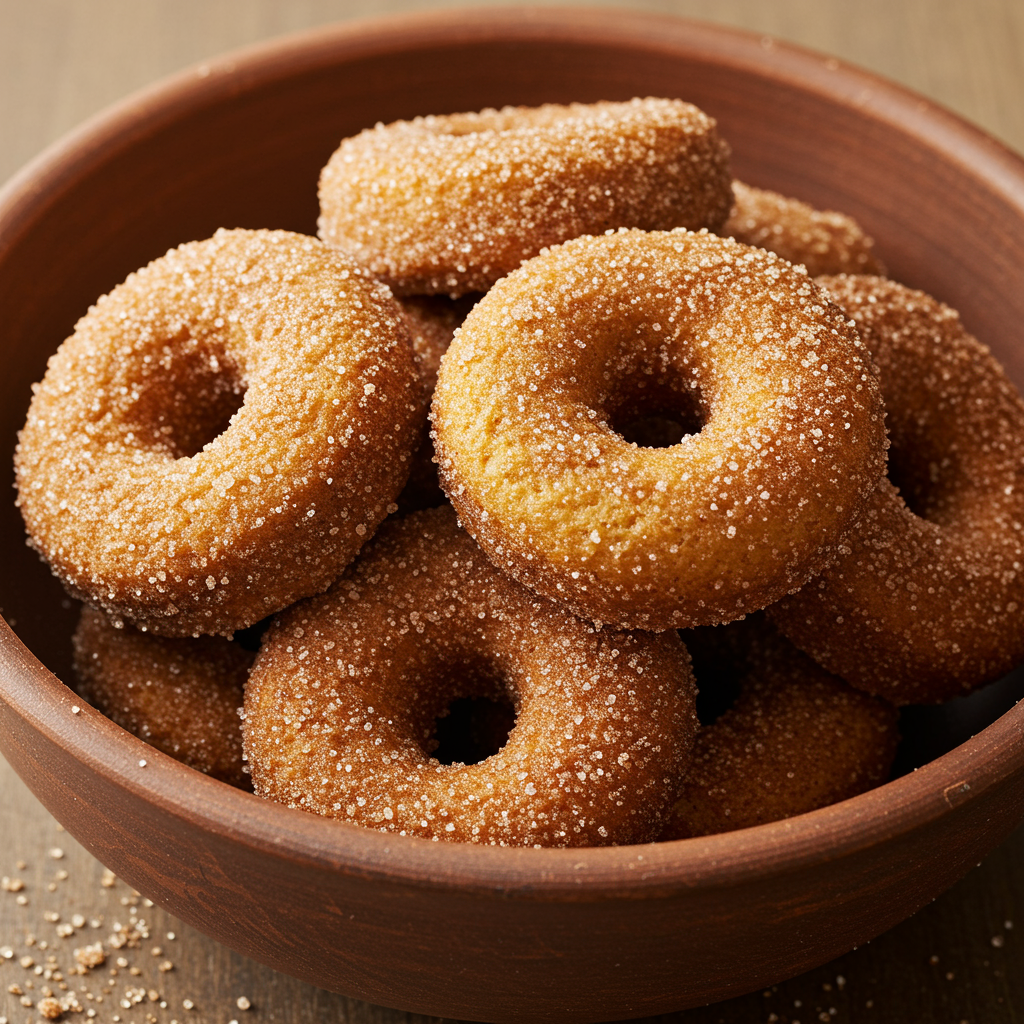
Yes, you read that right—donuts! This might be the most surprising transformation of all. By simply leaving out the savory garlic packet and adding a touch of sugar and vanilla, the cheesy biscuit mix becomes the perfect base for warm, cakey, and ridiculously easy drop donuts. They fry up in minutes and are absolutely irresistible when rolled in a thick coating of cinnamon sugar.
Ingredients
- 1 box Red Lobster Cheddar Bay Biscuit Mix
- ½ cup shredded cheddar cheese (optional, but highly recommended for a delicious sweet & savory flavor)
- 1 cup milk
- 2 tablespoons granulated sugar
- 1 teaspoon vanilla extract
- Vegetable oil, for frying (about 2-3 inches deep)
-
For the Coating:
- ½ cup granulated sugar
- 1 tablespoon ground cinnamon
Instructions
- Heat the Oil: In a heavy-bottomed pot or deep skillet, pour in about 2-3 inches of vegetable oil. Heat it over medium heat until it reaches 350°F (175°C). Use a candy or frying thermometer for accuracy. If you don’t have one, a small drop of batter should sizzle immediately and turn golden in about 60 seconds.
- Set Aside the Savory: Crucial step: Set aside the garlic & herb seasoning packet for another recipe. You will not use it here.
- Make the Donut Batter: In a medium bowl, combine the dry biscuit mix, 2 tablespoons of granulated sugar, and the optional cheddar cheese. The cheese might sound strange, but the salty tang is an amazing counterpoint to the sweet cinnamon coating. In a separate small bowl, whisk the milk and vanilla extract, then pour it into the dry ingredients. Stir until a thick, smooth batter forms.
- Prepare the Coating: In a shallow dish or a paper bag, mix the ½ cup of sugar and 1 tablespoon of cinnamon for the coating. Set it nearby.
- Fry the Donuts: Once the oil is hot, carefully drop rounded tablespoonfuls of batter into the oil. Don’t overcrowd the pot; fry only 4-5 donuts at a time to keep the oil temperature stable.Pro-Tip: Use two spoons or a small spring-loaded cookie scoop to easily and safely drop the batter into the hot oil. This keeps your hands clean and helps make the donuts a more uniform size so they cook evenly.
- Flip and Finish: Fry for 1-2 minutes per side, turning them once they are deep golden brown on the bottom. They cook quickly! They should be fully cooked through and wonderfully puffy.
- Coat and Serve: Use a slotted spoon to remove the donuts from the oil and let them drain for just a moment on a wire rack or paper towel-lined plate. While the donuts are still hot and fresh, toss them in the cinnamon-sugar mixture until they are generously coated. These are best eaten immediately, while still warm.
10. Sweet & Salty Chocolate Chip Cookies
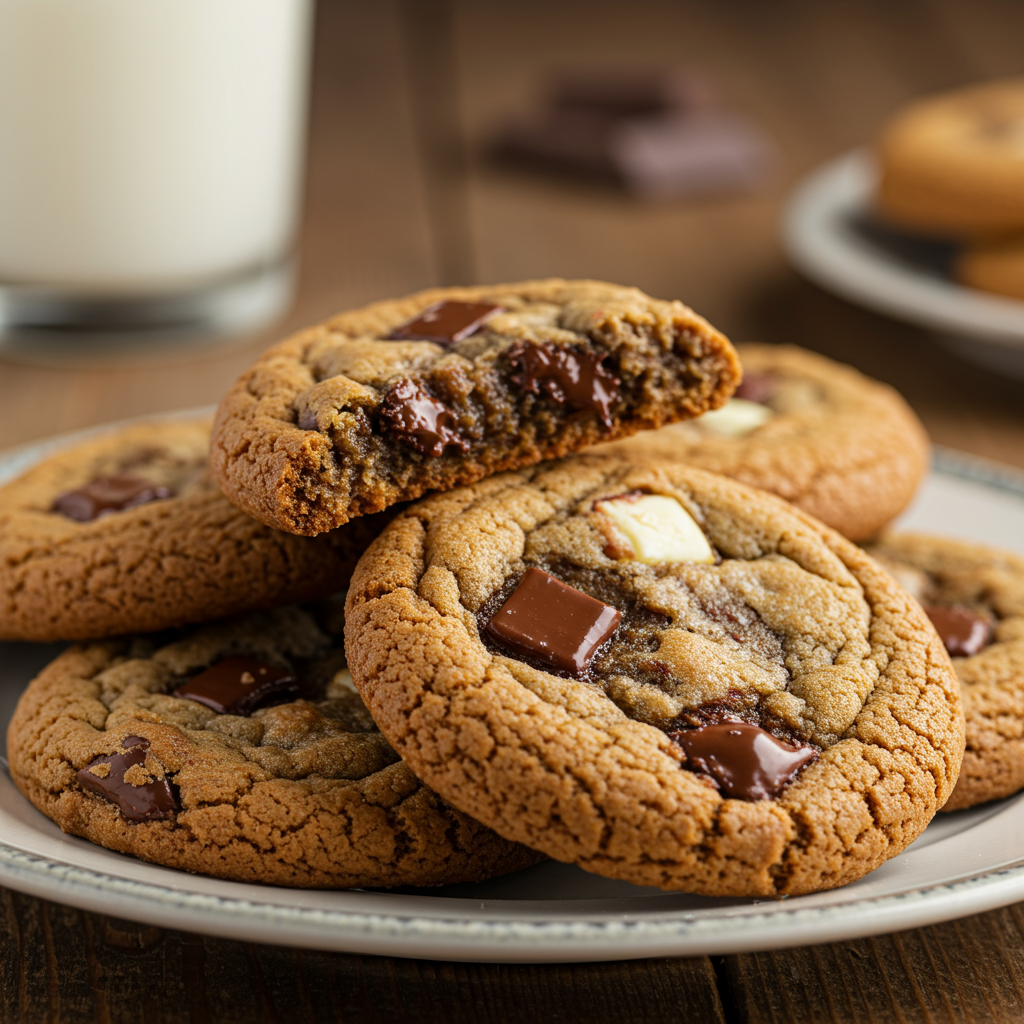
Prepare to have your mind, and your taste buds, completely blown. The salty, cheesy, buttery notes of the biscuit mix create an unbelievably delicious, chewy, and complex chocolate chip cookie. This isn’t your average cookie; it’s a sophisticated treat with layers of flavor. It’s the ultimate sweet and savory mashup that will have everyone begging for the recipe—and your secret ingredient.
Ingredients
- 1 box Red Lobster Cheddar Bay Biscuit Mix
- ½ cup all-purpose flour
- ½ cup packed brown sugar
- ¼ cup granulated sugar
- ½ cup (1 stick) unsalted butter, softened to room temperature
- 1 large egg
- 1 teaspoon vanilla extract
- 1 cup semi-sweet chocolate chips
- Optional: ¼ teaspoon from the garlic & herb seasoning packet for a bolder, more complex savory kick. (Trust us!)
Instructions
- Prep Oven and Pans: Preheat your oven to 350°F (175°C). Line a baking sheet with parchment paper to prevent sticking and ensure even baking.
- Cream Butter and Sugars: In a large bowl, using an electric mixer or a stand mixer with the paddle attachment, cream together the softened butter, brown sugar, and granulated sugar. Beat on medium-high speed for 2-3 minutes until the mixture is light, fluffy, and pale in color. This step incorporates air, which is key for a good cookie texture.
- Add Egg and Vanilla: Beat in the egg and vanilla extract until well combined, scraping down the sides of the bowl as needed.
- Combine Dry Ingredients: In a separate bowl, whisk together the dry biscuit mix and the all-purpose flour. The extra flour helps give the cookies the perfect structure. If you’re feeling adventurous and trust the process, add the optional ¼ teaspoon of the garlic seasoning. It sounds wild, but it adds a subtle, rosemary-like herbal note that makes the flavor incredibly interesting.
- Mix the Dough: Gradually add the dry ingredients to the wet ingredients, mixing on low speed until just combined. As with all the other recipes, be careful not to overmix once the flour is added.
- Fold in Chocolate: Switch to a spatula and fold in the semi-sweet chocolate chips until they are evenly distributed throughout the dough.
- Scoop and Bake: Drop rounded tablespoonfuls of dough onto the prepared baking sheet, placing them about 2 inches apart to allow for spreading.Pro-Tip: For that perfect, bakery-style look, press a few extra chocolate chips onto the tops of the dough balls right before they go into the oven.
- Bake: Bake for 10-12 minutes. The edges should be set and golden brown, but the centers should still look slightly soft and underdone. This is the secret to a chewy cookie.
- Cool and Enjoy: Let the cookies cool on the baking sheet for 5 minutes. They will continue to cook from the residual heat. After 5 minutes, transfer them to a wire rack to cool completely.
Frequently Asked Questions (FAQ)
Can I really use this savory mix for sweet recipes like donuts and cookies? Yes, absolutely, and the results are spectacular! The key is to omit the garlic seasoning packet and balance the mix’s inherent saltiness with sweet ingredients like sugar, vanilla, cinnamon, or chocolate chips. The cheesy, buttery base creates a unique and delicious sweet-and-savory flavor profile that works surprisingly well and adds a layer of complexity you won’t get from a standard baking mix.
How do I prevent my biscuits, dumplings, or toppings from getting tough? The number one cause of tough, dense results is overworking the dough. When you mix flour with liquid, you develop gluten. A little gluten is good, but too much makes things tough. Mix your ingredients only until they are just moistened and combined. A lumpy, slightly shaggy, and even sticky batter is your friend. A light hand is essential for a tender, fluffy result.
Can I prepare the dough ahead of time? While you’ll always get the best, fluffiest results from baking the dough immediately after mixing, you can get away with some prep. You can prepare the dough and store it covered in the refrigerator for a few hours. For any longer storage, it’s much better to fully bake the items (like biscuits or waffles), let them cool, and freeze them. Then you can reheat them in the oven or toaster before serving.
My dough is too sticky to handle for recipes like pizza or calzones. What did I do wrong? You did nothing wrong! This is a very soft, high-hydration dough. If it’s too sticky to roll out, don’t panic. The fix is simple: liberally flour your work surface, your hands, and your rolling pin. You can also gently knead in a small amount of additional all-purpose flour, a tablespoon at a time, until the dough becomes smooth and manageable.
I lost the garlic butter packet! What can I do for a substitute? It’s an easy fix! To recreate that signature buttery topping, simply melt 2 tablespoons of butter and mix in ¼ teaspoon of garlic powder, ¼ teaspoon of dried parsley, and a small pinch of salt. Whisk it together, and you’re good to go.
Can I use the dry mix as a coating for other foods? Definitely! The Crispy Oven-Baked Chicken recipe is just the beginning. The dry mix is a fantastic savory breading for all sorts of things. Try it on fish fillets for a new take on fish and chips, on thick-cut onion rings, on mozzarella sticks for an extra cheesy crunch, or even on sliced green tomatoes before frying.
Conclusion: Your Pantry’s New Secret Weapon
Who knew that one little red box held so much untapped potential? We’ve journeyed far beyond the classic side dish, transforming the humble Red Lobster Cheddar Bay Biscuit Mix into a crispy pizza crust, fluffy dumplings, savory waffles, decadent cookies, and so much more.
The real takeaway here isn’t just a list of recipes; it’s a new mindset for the kitchen. It’s about looking at the staples in your pantry with fresh eyes and a sense of adventure. That box of mix isn’t just for biscuits—it’s a foundation for flavor. It’s a shortcut to comfort, a building block for creativity, and your ticket to a quick, impressive, and deeply satisfying meal any night of the week.
So the next time you see that iconic red box on the shelf, don’t just see biscuits. See possibilities. See calzones. See waffles. See cookies. The kitchen is your playground, and this mix might just be your new favorite toy.
Helpful Resources
- https://www.foodrepublic.com/1540517/unexpected-ways-use-red-lobster-cheddar-bay-biscuit-mix/
- https://www.thekitchn.com/red-lobster-cheddar-bay-biscuits-recipe-22951848
- https://entertainingthervlife.com/red-lobster-biscuits/
- https://www.reddit.com/r/Costco/comments/180tx4s/red_lobster_biscuit_mix_any_tips_or_opinions/